Script to activate Boldon James Classifier and applying the Service Endpoint

Well, in the previous post Installation and Configuration of Boldon James Classifier for SharePoint, we learned how to install, configure and enable Boldon James Classifier for SharePoint.

In that Post, we had a section which was about how to activate the Boldon James SharePoint Classifier Feature for the site collection and apply endpoint. If we have few sites, we can do it manually. However, think about a big farm which has multiple web applications and each web application has thousands of site collections, the task becomes very tedious and challenging.

Therefore, we need some sort of script or code which can do this for us without having us putting more effort. For that, first thing came to my mind is PowerShell script. Well, I went ahead and prepared the script which makes our task much easier. All we need to do is, just place the script in the SharePoint server, provide few inputs at run time. That’s it, script will take over from there and do our task.

Script:

Copy the code from below document as it is and paste into a notepad. Save it as a .ps1 file.

Link to download the document

Note:

Before running the script, change the domain at line 136 in the script [shown below].

$myDomain = “yourdomain.com”

Inputs:

  1. The script prompts for the first input which is selecting scope. It provides us 3 options namely Site, Web Application and Farm. Based on the need, we can select the appropriate option.
  2. Next input required is Boldon James Classifier Web service URL. We need to provide URL till .svc. For Example: http://bj-classifier.domain.com:8080/ClassifierWCFService/ClassifierWCFService.svc
  3. Third input will be asked if we select option “Site” or “Web Application” for first input. If option selected was “Site”, it will ask for the site collection URL and if “Web Application” was selected, it will ask for Web Application URL.

If we provide any invalid input, script will prompt again until it receives valid input. Once it receives all valid inputs, it will take care of remaining task and upon the completion of execution, it will show us the summary. For more detailed reports [if we selected “Site” or “Web Application” option], it will generate a CSV file in the same directory where the script is placed and display path of the output CSV in PowerShell window.

That’s it, we can just go to site collection and verify whether it did the job or not 🙂

I’m currently working on preparing the script for applying the endpoint on the document libraries and shall be posting once it’s ready.

Thanks for reading and using the script…

Happy SharePointing and Scripting.

Installation and Configuration of Boldon James Classifier for SharePoint

Boldon James Configuration

Introduction

Boldon James Classifier

Boldon James Classifier provides a service endpoint (SOAP) which can be used and integrated with SharePoint. Boldon James Classifier Service collects the classification policies from the corporate policy server and populates the same as properties of documents in SharePoint. Users can use the classifier labels and select the appropriate value for each document/item in SharePoint. This classifier service more improved way of classifying and securing the contents uploaded/added to SharePoint.

SharePoint

Boldon James Classifier comes with different version. If you are using SharePoint 2010, you can use Boldon James Classifier 2010. If you are using SharePoint 2013, you can make use of Bolder James Classifier 2013.

Integrating Boldon James Classifier requires below:

  • Installation of appropriate Boldon James Classifier Service (2010/2013)
  • Adding and Deploying Boldon James Classifier Solution
  • Activating Boldon James Classifier in SharePoint site and document library

Setup Application Pool and Web site for Boldon James Classifier

Before you go ahead and integrate Boldon James Classifier with SharePoint, you need to setup an application pool and web site which can be used by Boldon James Classifier Service.

Create Application Pool

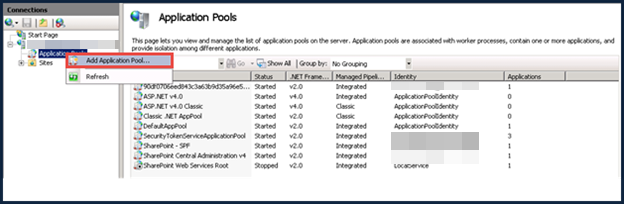
Step 1: Navigate to Internet Information Services (IIS)

Step 2: Right Click on “Application Pools” and then click on “Add Application Pool”

bj-1

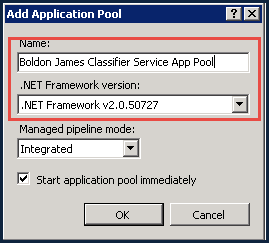
Step 3: Provide a name for the application pool and select .Net version as v2.0.50727

bj-2

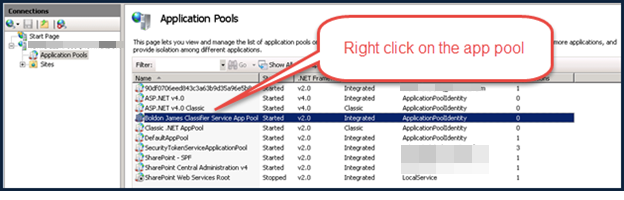
Step 4: Set service account as application pool identity

Right click on the application pool and then click on “Advanced Settings”

bj-3

Change the application pool account from default “ApplicationPoolIdentity” to service account.

bj-4

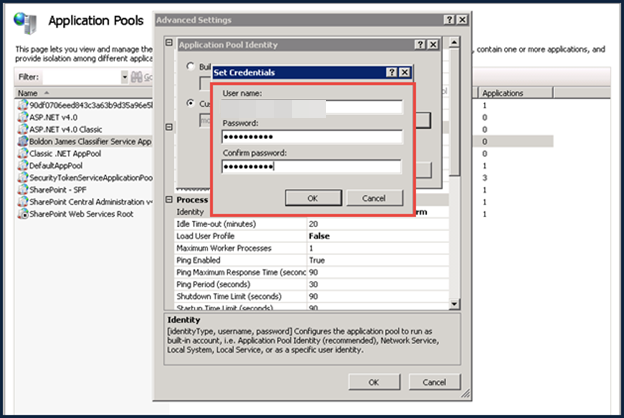
Once done changing the identity, please restart the app pool

Create Web Site

Step 1: Navigate to the folder where IIS Virtual Directories are present. Default Location is C:\inetpub\wwwroot\wss\VirtualDirectories

Step 2: Create a new folder with some name (for e.g. Boldon James)

bj-5

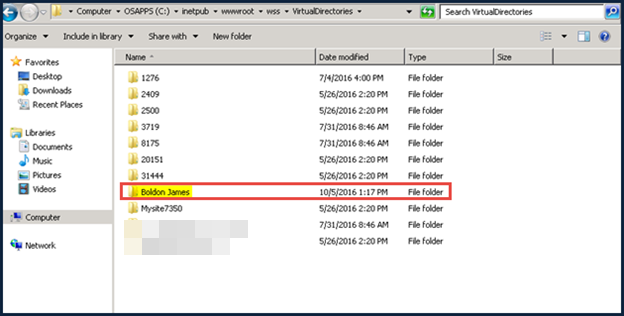
Step 3: Verify permissions for service account on new folder

Make sure the farm service account has full control on the newly created folder

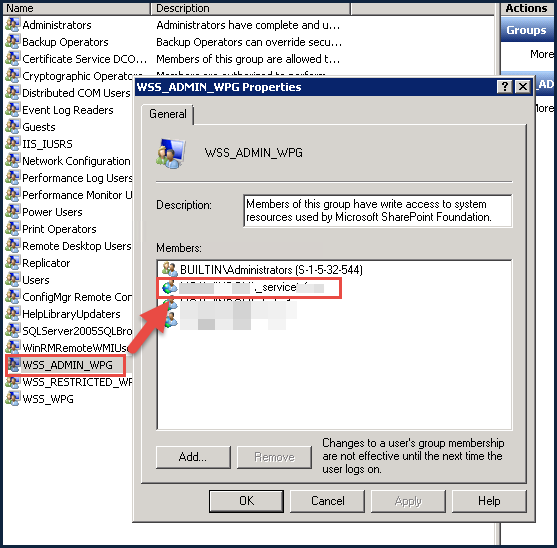
Step 4: Ensure Service Account is part of “Administrators and “WSS_ADMIN_WPG” groups

Navigate to “Local Users and Groups” (Start à Run à lusrmgr.msc). Verify account is part of the above mentioned groups.

bj-6

bj-7

Step 5: Navigate to IIS and right click on “Sites”, then select Add Web Site” option

bj-8

Step 6: Select Application Pool which you created in Step 3 of Create Application Pool Section

bj-9

Step 7: Enter the required Details

  • Site Name: BJ – Classifier Service
  • Physical Path: Path of the folder you created in Step 2 of this section. In this case, it is C:\inetpub\wwwroot\wss\VirtualDirectories\Boldon James

Note: In below screenshot it shows some other path. Don’t get confused or carried away. Ignore that and put the actual path of folder which you created.

  • Port: 8080 [Please don’t specify any other port, otherwise classifier service will not work].
  • Host Name: bj-classifierservice.domain.com

bj-10

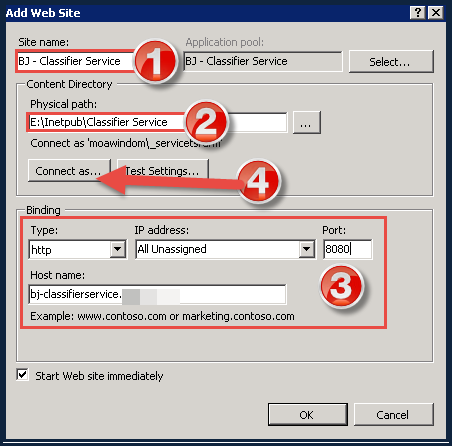
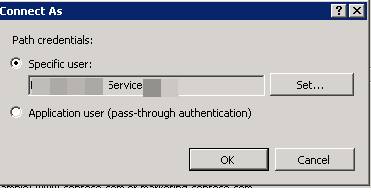
Step 8: Change the service account to be used for site

  • Click on “Connect as” as shown in 4th point in above screenshot.
  • Select the option “Specific user” as shown below and click on “Set” button to specify the credentials. Once done, click Ok.

bj-11

Step 9: Now click on “Test settings” to validate the connectivity.

Step 10: Finish creation of site by Clicking on Ok button.


Installing Boldon James Classifier Service

Install the Setup

Go to the folder where Classifier Package is available.

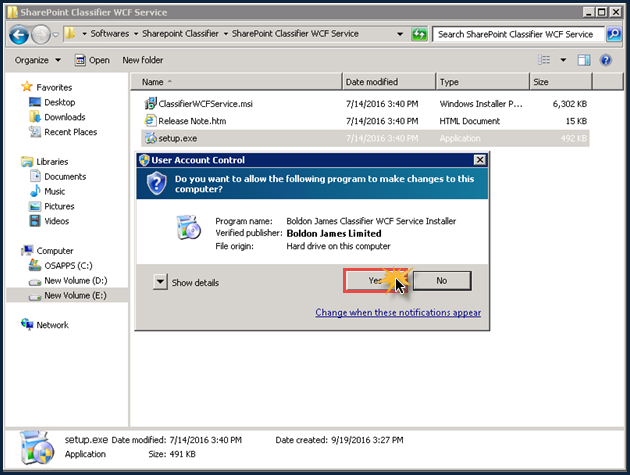
Step 1: Run Setup.exe as administrator.

bj-14

Step 2: Allow User Access Control to run the exe by clicking on Yes

bj-15

Step 3: Click Next and agree to the license terms.

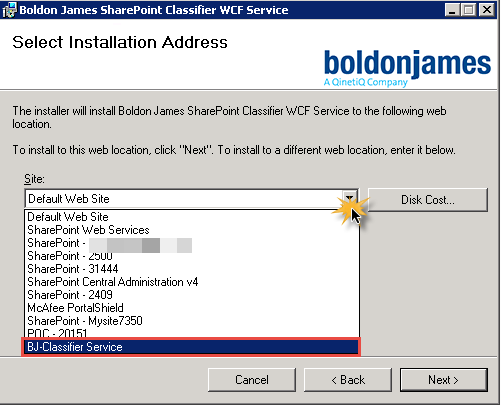
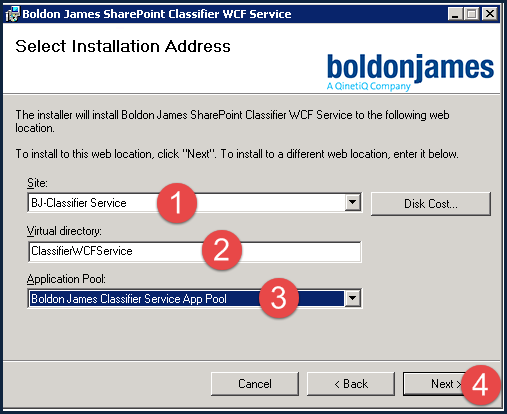
Step 4: Select Site which you created for Classifier Service.

bj-18

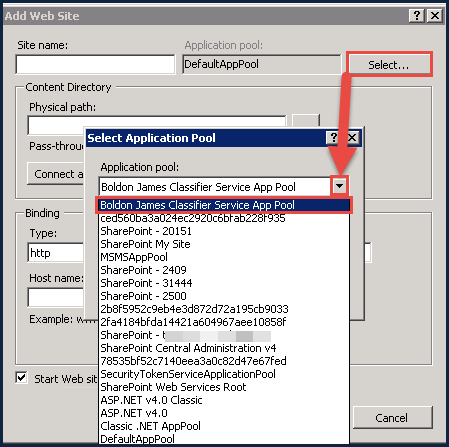
Step 5: Select Application Pool which you created for Classifier Service.

bj-19

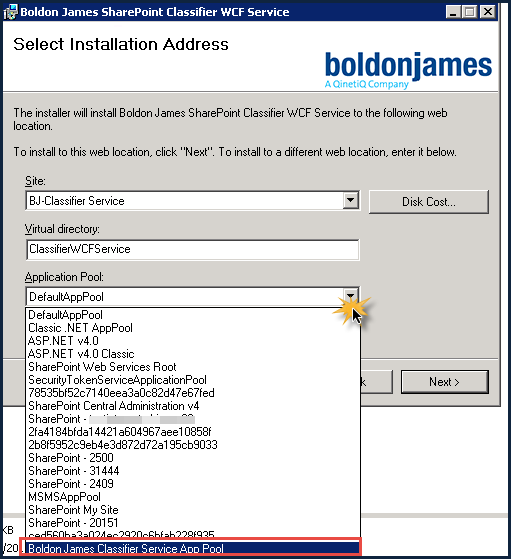
Step 6: Verify the settings and click Next.

Note: Make sure you don’t change the Virtual Directory name.

bj-20

Step 7: Start the installation.

Step 8: Finish the installation.

bj-23

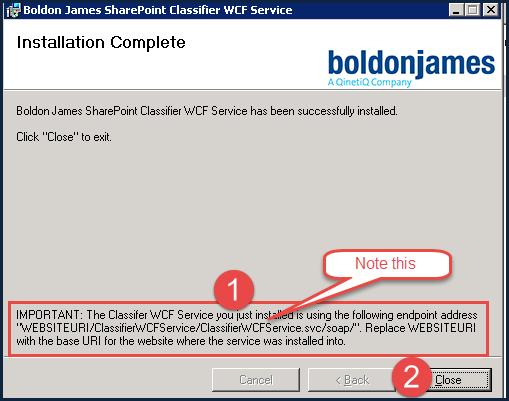
Make a note of endpoint URL format: Make a note of the endpoint URL mentioned in the below screenshot as “Important”

Website URI should be replaced by the site URL which we created in the previous step. This will be used for enabling the classifier service in the document library in SharePoint. This will discussed later in this article.

Ex: http://www.sharepoint.com:8080/ClassifierWCFService/ClassifierWCFService.svc/soap/ à this would be the endpoint URL if the web site URL you created is www.sharepoint.com . The reason for specifying the port number as 8080 here is because we created the site using 8080 port number.

Setup registry

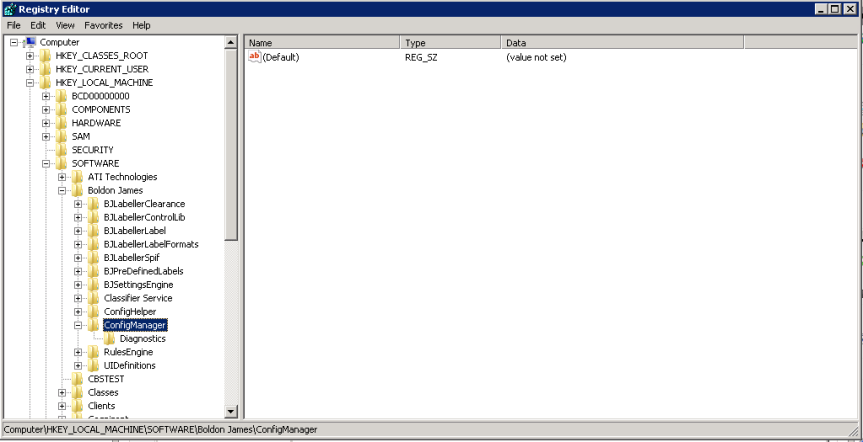
Step 1: Open Registry Editor (Start > Run > regedit.exe).

Step 2: Navigate to the below key.

HKEY_LOCAL_MACHINE\SOFTWARE\Boldon James\ConfigManager”

At this point, you will see nothing in this folder except “Default” Key.

bj-24

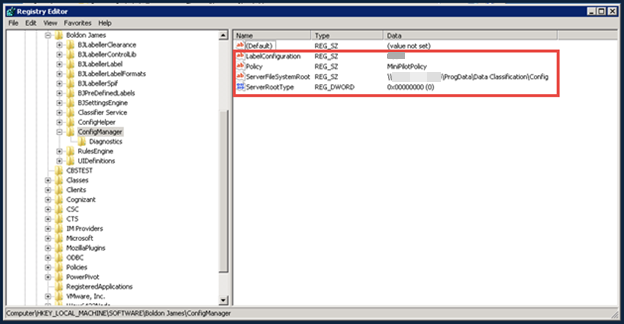
Step 3: Create required registries as per below table.

Reg Key Name Reg Key Type Reg Value
ServerRootType  REG_DWORD 0
ServerFileSystemRoot  REG_SZ(String Value) Network Path where Policy Configuration Folder is present (i.e. \\ServerName\ProgData\Data Classification\Config) wherein ServerName is the server where policy is configured.
LabelConfiguration  REG_SZ Name of the Labels folder (paste the value as Policies) wherein Policies is the folder in which all the labels are configured in ServerName.
Policy  REG_SZ All users (mention as All users)

Demonstration of new key creation:

Right click in blank space area. click on New and Select appropriate type of key as per the table above.

bj-25

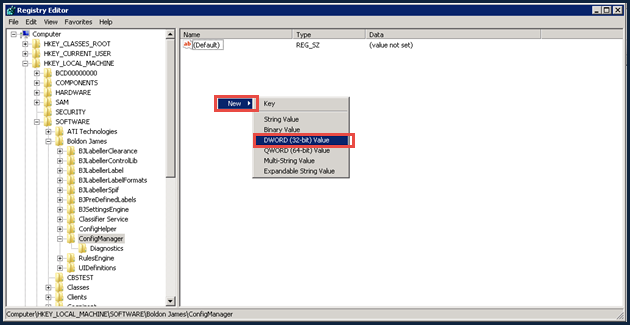
Enter the Name of key

bj-26

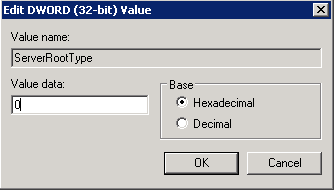
Now, right click and select Modify

bj-27

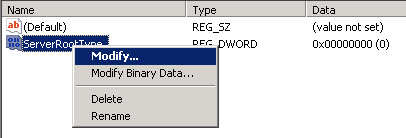
Enter Value and click Ok.

bj-28

Repeat this for creating all the entries.

Finally, it will look like below.

bj-29

Now that the configuration of Classifier service is done, let’s move further and deploy the WSP solution.

Deploy Boldon James Classifier Solution for SharePoint

Navigate to the folder “SharePoint 2010” or “SharePoint 2013” based on the version of SharePoint installed in your server and get the wsp file path. This will be used for adding the solution.

Ex for SP 2013 : E:\software\Bolden James\Sharepoint Classifier\Sharepoint Classifier 2013

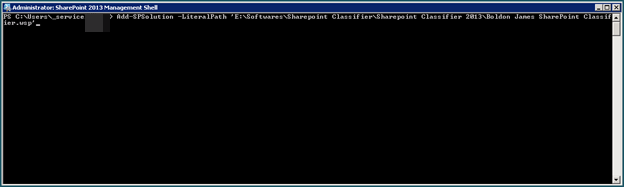
Step 1: Run SharePoint PowerShell using Service Account.

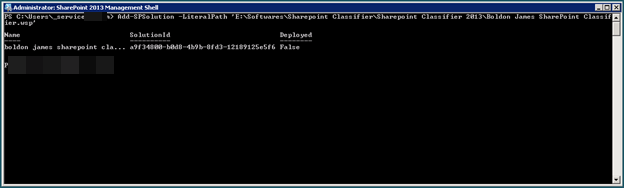
Step 2: Add the WSP solution to the farm.

Run below command to add the solution to farm.

Add-SPSolution –LiteralPath

Example:

Add-SPSolution –LiteralPath “E:\software\Bolden James\Sharepoint Classifier\Sharepoint Classifier 2013\Boldon James SharePoint Classifier.wsp”

bj-30

Once the command executes successfully, you will see the solution.

bj-31

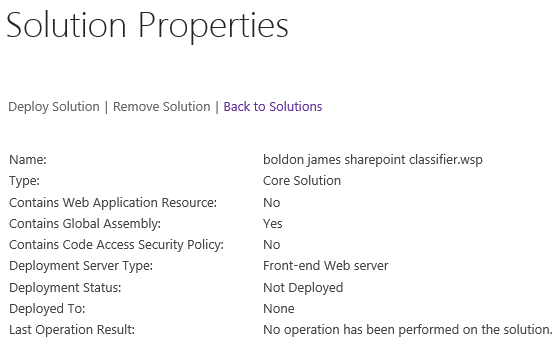
To verify in CA, navigate to Central Administration > System Settings > Manage Farm Solutions. You will see the WSP solution added. However, status will be shown as “Not Deployed”.

bj-32

If you click on the WSP name, you can see more details about the solution.

bj-33

Step 3: Deploy the solution.

Deploy the solution using below command or you can deploy it using the “Deploy Solution” link appearing on solution properties page as shown in above screenshot.

Install-SPSolution –Identity “boldon james sharepoint classifier.wsp” –GACDeployment

bj-34

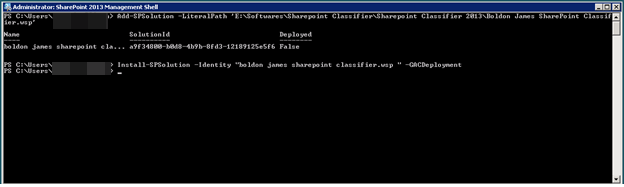
Deployment of the solution will started and you can see the status in Solution Management page.

This slideshow requires JavaScript.

Configure SharePoint Site(s) to avail Boldon James Classifier Service

There are three steps to configure classifier in SharePoint.

  1. Activate the feature at site collection level
  2. Apply the service endpoint
  3. Add the classifier endpoint to the library

Create a new SharePoint site (Team site template)

1.    Activate Feature

Step 1: Open Site Collection Features.

Go to site collection settings > Site collection features

Step 2: Spot the feature “Boldon James SharePoint Classifier Document Library”.

Step 3: Activate the feature by clicking on “Activate” button.

bj-38

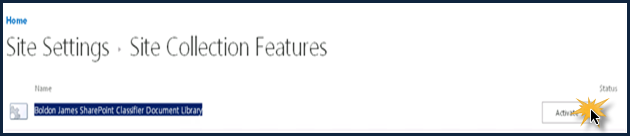
Step 4: Verify that the feature is activated.

bj-39

2.    Apply Classifier Endpoint

Step 1: Navigate to Site Settings.

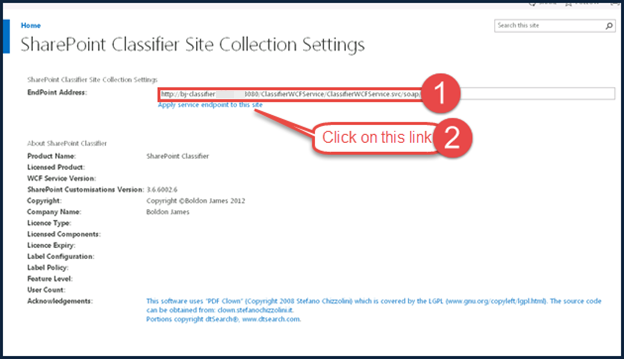
Step 2: Open “Boldon James Classifier Site Collection Settings” under “Site Collection Administration”.

Step 3: Provide the service endpoint URL and click on “Apply service endpoint to this site”.

Note: The Endpoint address is the one which you noted at the time of finishing the Boldon James Classifier Service installation. (i.e. http://www.sharepoint.com:8080/ClassifierWCFService/ClassifierWCFService.svc/soap/ )

In this case, it is http://bj-classifier.domain.com:8080/ClassifierWCFService/ClassifierWCFService.svc/soap/

bj-40

If it fails as shown below. Follow the instructions described in “Classifier Web Site Issues and Solutions”.

bj-41

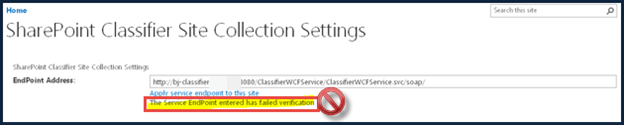
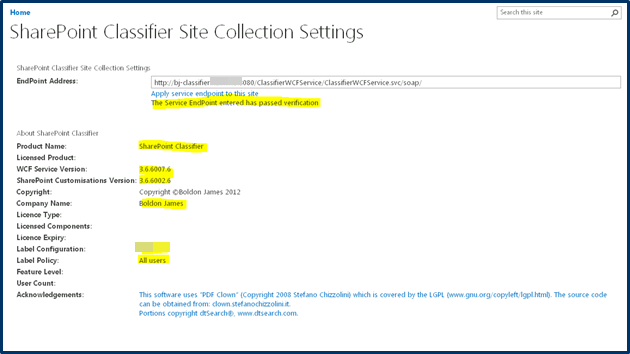
Once the issues are fixed, repeat this step again. It should apply the service endpoint to site successfully.

It will also populate all the values as shown below.

bj-42

3.    Apply SharePoint Classifier to Library

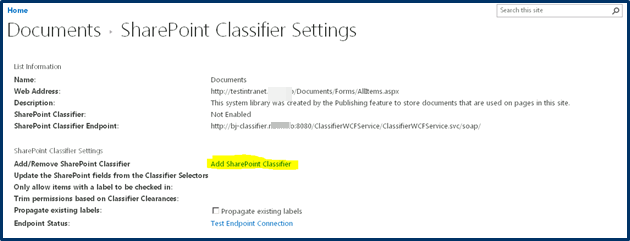
Step 1: Navigate to the document library where you want to use Classifier.

Step 2: On the ribbon, click on “Library” tab and then click on “Classifier Settings” button appearing at the extreme right.

bj-43

Step 3: Click on “Add SharePoint Classifier”.

bj-44

Testing the functionality

Step 1: Navigate to Document Library where you have added the SharePoint Classifier.

Step 2: Upload a document.

Step 3: Select the file by clicking on “Check” mark appearing at left side of the file name. Once selected, click on “Files” tab on ribbon, you will see “Classifier” button highlighted as below

bj-45

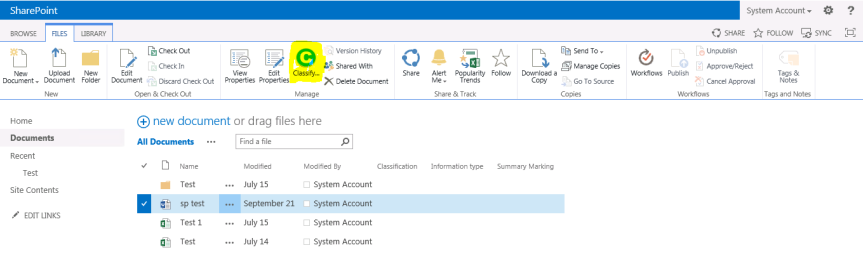
Click on the Classifier button

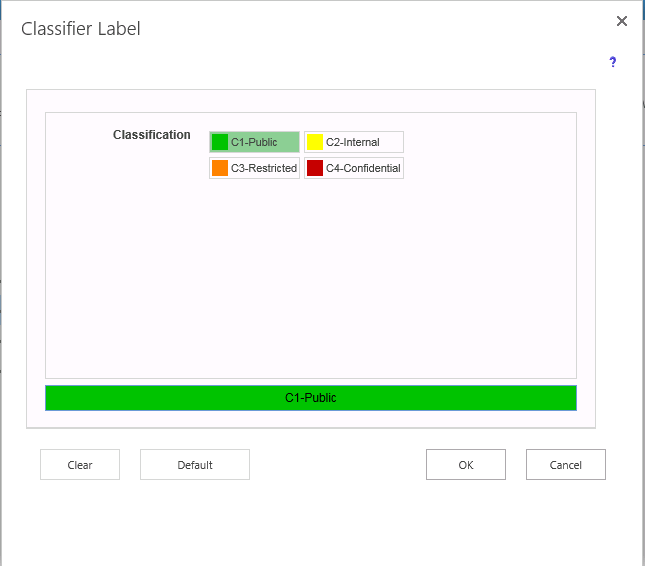
Now “Classifier Label” dialog will appear as shown in below step.

Step 4: Select a classification value and click Ok.

Hints:

  • Clicking on the Confidentiality category sets the classification value for the document.
  • Clicking on “Clear” button clears the classification.
  • Clicking on “Default” applies the default value as per policy.

bj-46

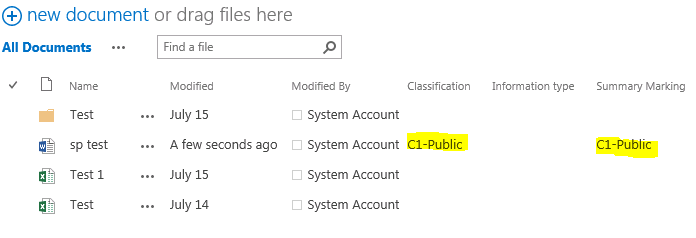
Step 5: Verify the classification.

Once you click Ok after selecting a classification label, you should be able to see the same in document properties as shown below.

bj-47

Classifier Web Site Issues and Solutions

First check if the Classifier website that we created initially is loading successfully. Else if will throw an error as shown below.

bj-48

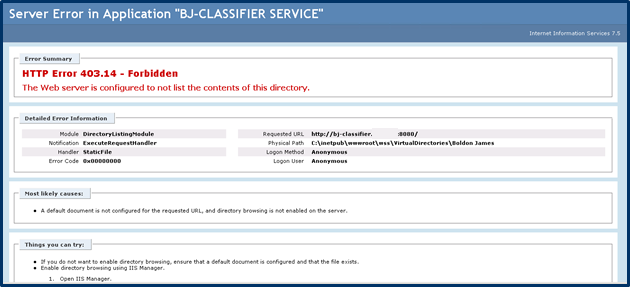
To fix the above error, navigate to IIS Manager and click on the “Bolden James classifier site “ that we created before. Open “Directory Browsing” module under IIS section.

bj-49

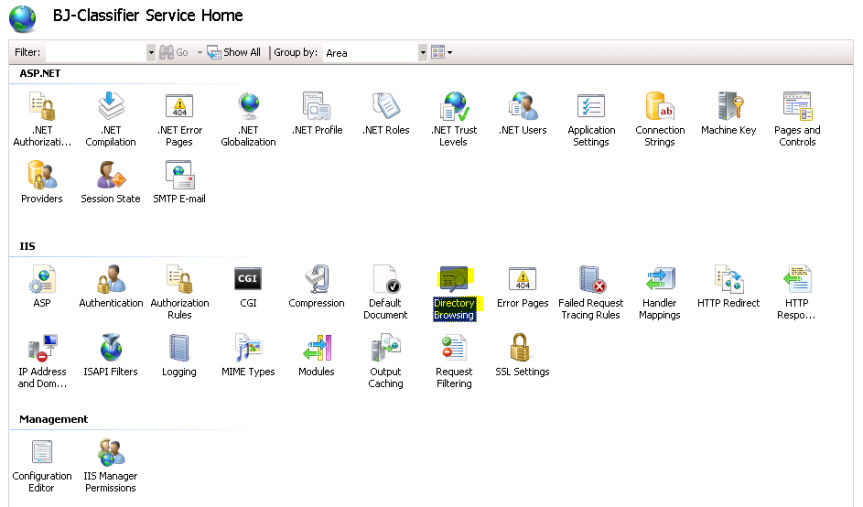
And click on the “Enable” button towards your right hand side.

Once done go ahead and restart the site in IIS

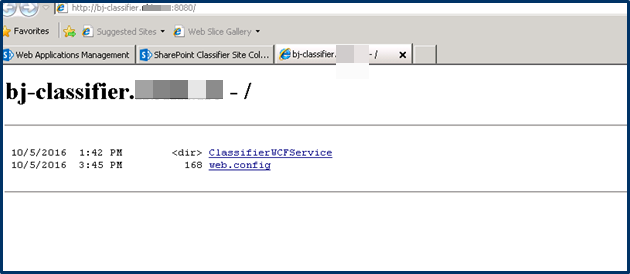
Try to navigate to the site again and see if it works now .You should see the below which confirms that the site is working fine.

bj-50

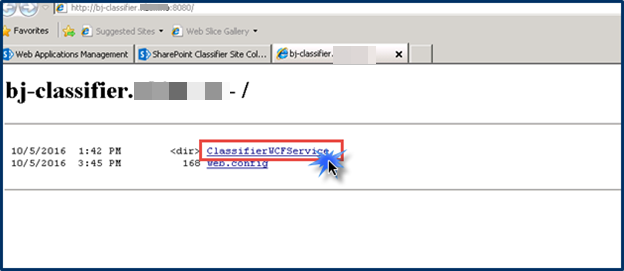
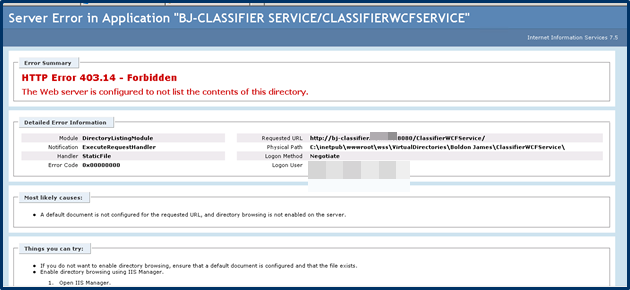
Once done, click on “ClassifierWCFService” link which you see in the image above and confirm that it loads fine.

bj-51

It might throw an error as shown in the image below.

bj-52

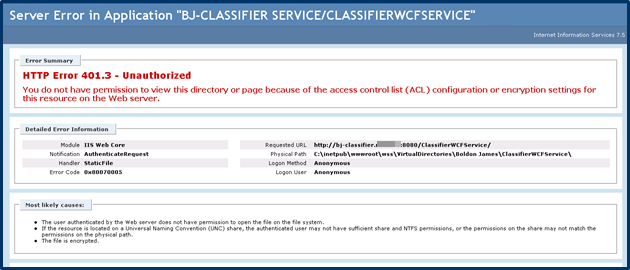
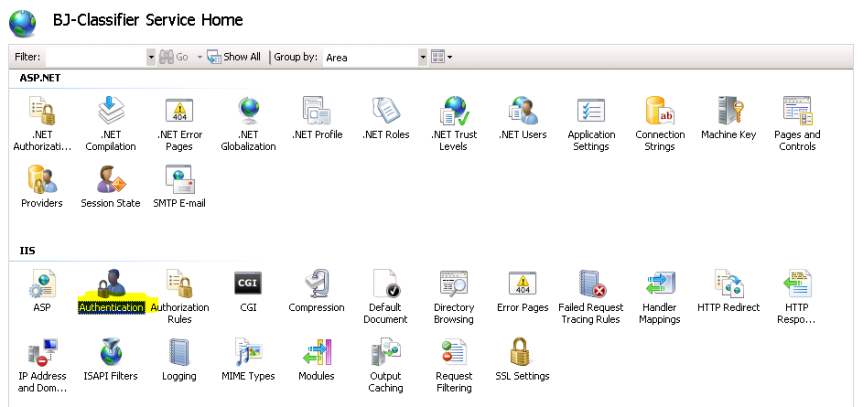
In order to fix this issue, again go to IIS manager, select the Boldon James site. Open “Authentication” module and enable “Basic and Windows Authentication”

bj-53

Once done, please restart the website and try to open the site again .This may throw an error as shown below and this can safely ignored.

bj-54

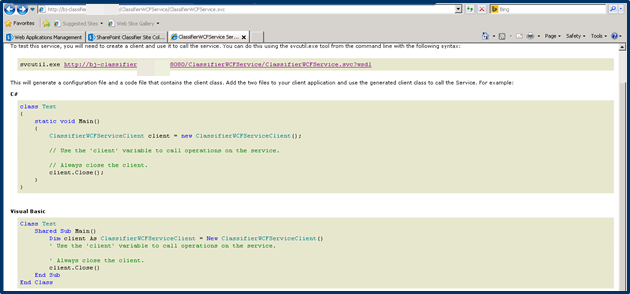
Add ClassifierWCFService.svc at the end of URL (Full URL will look like this: http://bj-classifier.domain.com:8080/ClassifierWCFService/ClassifierWCFService.svc) and browse it. It should load successfully as below if this step is successful, you should be able to apply the service end point to SP site.

bj-55


Restoring Quick Links in User’s MySite

Recently I came across an issue where user reported that he lost Quick Links stored in his MySite. User said that he had many links added in his MySite and all of a sudden they vanished. Since he did not have any local copy of those links, he requested help in getting them back as those were very important links related to his projects’ sites in SharePoint. User also told that none of his colleagues lost their quick links. So, it was evident that the issue was not a major one as it impacted only single user, and whatever happened would have been accidental.

At first, I was wondering how it can happen until done intentionally. However, later I realized that any application can run into weird issues and SharePoint is not an exception.

I did following troubleshooting with no success in getting what’s wrong with that user’s quick links.

  1. Recreated user’s MySite
  2. Restored the content database, containing user’s MySite, using DPM [Data Protection Manager] and then restored the MySite using PowerShell.
  3. Checked if there are any links stored in user’s profile using PowerShell . It didn’t show any.

$site = Get-SPSite https://mysites.mydomain.com

$serviceContext = Get-SPServiceContext $site

$upm = new-object Microsoft.Office.Server.UserProfiles.UserProfileManager($serviceContext)

$User = $upm.GetUserProfile("domain\userName")

$User.QuickLinks.GetItems() | Select Title, URL | FT –auto

 After a long brainstorming session, finally I decided to opt a different approach in order to get the links back. It was risky though but since there were some signs of assurance, I went ahead with this one.

Since all the details related to user profiles are stored in the “User Profile Database”, I wanted to restore the database from an earlier backup. Usually, we need assistance of person who handles the SQL part. However, in my case, I had access to the SQL instance. Upon that, we were having DPM [Data Protection Manager] which regularly takes backup of all our databases. This made my task easier than it sounded.

First, I found the name of User Profile Database used by our User Profile Service Application.

Central Administration > Manage Service Applications

Select User Profile Service Application and click on the “Properties” button available in the ribbon area on top of the page.

Get the User Profile Database Name and Server details.

1

Next, I connected to DPM, retrieved the User Profile Database from earlier recovery point and stored its .mdf and .ldf files into an SQL server.

I attached these files to SQL instance.

Navigated to “Databases” > “UserProfileDB” > Tables > UserProfile_Full.

Executed the query against the table.

USE [UPSProfileDB]

GO

SELECT [PartitionID]

,[RecordID]

,[UserID]

,[NTName]

,[PreferredName]

,[Email]

,[SID]

,[Manager]

,[SipAddress]

,[LastUpdate]

,[LastUserUpdate]

,[LastImported]

,[bDeleted]

,[DataSource]

,[MasterRecordID]

,[ProfileSubtypeID]

,[DSGuid]

,[PictureUrl]

FROM [dbo].[UserProfile_Full] WHERE NTName = 'domain\userName'

GO

Noted down the RecordID.

2

Now ran below query against “UserLinks” table. RecordID the value which I noted down in the previous step.

USE [UPSProfileDB]

GO

SELECT [PartitionID]

,[Id]

,[RecordId]

,[Title]

,[GroupType]

,[GroupTitle]

,[Url]

,[ContentClass]

,[PolicyId]

,[ItemSecurity]

FROM [dbo].[UserLinks] WHERE RecordId = 7627

GO

3

Fingers were crossed while executing the query and that did the trick probablyJ. I got the list of links which were missing in user’s MySite.

Since I got the links and user confirmed that those were the links, final step was to add them back to User’s profile in User Profile Service Application so that user’s MySite shows the same.

I ran below command to add the link for testing.

$site = Get-SPSite http://mySiteHost.domain.com

$serviceContext = Get-SPServiceContext $site

$upm = new-object Microsoft.Office.Server.UserProfiles.UserProfileManager($serviceContext)

$user = $upm.GetUserProfile("domain\NTID")

$User.QuickLinks.Create("Test", "https://www.google.co.in", "General", $null, "Private")

This command added the link to user’s quick links.

4

Though I could add all the links one by one, being lover of PowerShell scripting, I prepared a script to do the same in one shot.

Script:

Clear-Host
Write-Host -ForegroundColor Yellow "Attempting to load SharePoint snapin..."
Add-PSSnapin Microsoft.SharePoint.PowerShell -ErrorAction SilentlyContinue
if((Get-PSSnapin Microsoft.SharePoint.PowerShell -ErrorAction SilentlyContinue) -ne $null)
{
Write-Host -ForegroundColor Green "SharePoint Snapin has been loaded successfully..."
$InputAccepted = $false
While($InputAccepted -eq $false)
{
$InputFile = Read-Host -Prompt "Please provide path of CSV file containing links to be created"
if($InputFile -ne "" -and $InputFile -ne $null)
{
if((Test-Path $InputFile -ErrorAction SilentlyContinue) -eq $true)
{
Write-Host -ForegroundColor Green "Input path is accepted"
$InputAccepted = $true
}
else
{
Write-Host -ForegroundColor Red "Invalid Input, Please try again..."
}
}
}
if($InputAccepted -eq $true)
{
$Links = Import-Csv -Path $InputFile -Delimiter "," -ErrorAction SilentlyContinue
$LinksCount = ($Links | Measure-Object).Count
if($LinksCount -ge 1)
{
Write-Host -ForegroundColor Magenta "Retrieved $LinksCount links from the input file..."
}
else
{
Write-Host -ForegroundColor Red "No link found in the input file. Please store the links in input file and try again...."
}
}
else
{
Write-Host -ForegroundColor Red "Input path was not entered correctly, terminating the execution..."
}
$MySiteHostAccepted = $False
$MySiteHost = $null
While($MySiteHostAccepted -eq $false)
{
$MySiteHost = Read-Host "Please enter MySite Host URL"
if($MySiteHost -ne $null)
{
if(($MySiteRoot = Get-SPSite $MySiteHost -ErrorAction SilentlyContinue) -ne $null)
{
if($MySiteRoot.RootWeb.WebTemplate -eq "SPSMSITEHOST")
{
Write-Host -ForegroundColor Green "MySite Host URL accepted...."
$MySiteHostAccepted = $True
}
else
{
Write-Host -ForegroundColor Red "The URL provided by you isn't a MySite Host, please provide valid input.."
}
}
else
{
Write-Host -ForegroundColor Red "MySite Host URL does not exist, Please provide valid input..."
}
}
else
{
Write-Host -ForegroundColor Red "Invalid input, please try again..."
}
}

if($InputAccepted -eq $true -and $MySiteHostAccepted -eq $true)
{
$UserAccepted = $false
$User = $null
While($UserAccepted -eq $false)
{
$User = Read-Host -Prompt "Please enter user account [Ex. domain\NTID]"
if($user -ne $null -and $user -ne "")
{
$serviceContext = Get-SPServiceContext $MySiteRoot
$upm = new-object Microsoft.Office.Server.UserProfiles.UserProfileManager($serviceContext) -ErrorAction SilentlyContinue
if($upm -ne $null)
{
try
{
$UserProfile = $upm.GetUserProfile($User)
}
catch
{
Write-Host -ForegroundColor Red "User was not found in User Profile Manager, please enter valid user name..."
}
if($UserProfile -ne $null)
{
Write-Host -ForegroundColor Green "User name is accepted as it's found in User Profile Manager...."
$UserAccepted = $true
}
else
{
#Write-Host "Reason: " -NoNewLine
Write-Host -ForegroundColor Red "Non-existing or invalid user name, please try again.."
}
}
}
}
if($UserAccepted)
{
Write-Host -ForegroundColor Magenta "Retrieving the links from CSV file..."
Sleep -Seconds 5
Write-Host -ForegroundColor Green "Data is retrieved, $LinksCount links found..."
Write-Host -ForegroundColor DarkCyan "Adding the links to user's profile...."
$LinkCounter = 0
$SuccessCount = 0
$FailedCount = 0
ForEach($Link in $Links)
{
$LinkCounter++
Write-Host -ForegroundColor Yellow "Attempting to add link no. $LinkCounter out of $LinksCount `r" -NoNewLine
try
{
$AddedLink = $userProfile.QuickLinks.Create($Link.Title, $Link.URL, "General", $null, "Private")
}
catch
{
#Write-Host -ForegroundColor Red "An error occurred while adding the link..."
$FailedCount++
}
if($AddedLink -ne $null -and $AddedLink.URL -eq $Link.URL)
{
$SuccessCount++
}
else
{
$FailedCount++
}
Sleep -Seconds 5
}
if($SuccessCount -eq $LinksCount -and $FailedCount -eq 0)
{
Write-Host -ForegroundColor Green "All links have been successfully added..."
}
else
{
Write-Host -ForegroundColor Yellow "Operation was partially successful..."
}
Write-Host -ForegroundColor Cyan "===================================================="
Write-Host -ForegroundColor White " Summary "
Write-Host -ForegroundColor Cyan "===================================================="
Write-Host -ForegroundColor Magenta "Total number of links: $LinksCount"
Write-Host -ForegroundColor Green "Link addition succeeded for: $SuccessCount links(s)"
Write-Host -ForegroundColor Red "Link addition failed for: $FailedCount link(s)"
Write-Host -ForegroundColor Cyan "===================================================="
}
else
{
Write-Host -ForegroundColor Red "An error occurred while processing the user profile..."
}
}
else
{
Write-Host -ForegroundColor red "Either of the inputs (input file path or MySite Host URL) was improper. Please enter valid inputs and try again..."
}
}
else
{
Write-Host -ForegroundColor Red "SharePoint Snapin could not be loaded, terminating the execution..."
}

Script required 3 inputs:

  1. Input file in CSV format containing links to be added. Created two columns in the file namely "Title" and "URL".
  2. MySite Host URL
  3. User Account

Once I provided the inputs as required, script did its job and made my life easier.

5

Bingo!!! All links were back.

6

Hope this helps someone!!!

Happy SharePointing……..